Showing posts with label tutorial. Show all posts

Tuesday, 26 June 2012

{Quick Tutorial} Ruffle Cushion

Hello blog followers!  Lovely to have you with us...

I just had to share this project as its super quick and super cute!  I know you're going to become addicted to making ruffle cushions in every colour to match every room.  Plus, the best bit is, it uses just one fat quarter and some ribbon - how easy is that!?


First things first this is what you'll need....


1 fabric FQ - mines from the Riley Blake Daisy Cottage Collection
Pins, Thread, Cushion/Toy stuffing, Sewing Machine

1. Start pinning your ribbon, about 3 inches in from one of the short edges of your fat quarter.  It doesnt need to be precise, just tuck it under and pin to keep in place until you sew it.


2. Once you've gone all the way down, machine sew into place using a long straight stitch.


3. Fold in half right sides together and pin in place.  Sew around two and a half edges so you have space to put the filling in.


4. Stuff with cushion filling and close the opening, and voila!  Very simple but very effective ruffle cushion....


I wasnt lying when I said they are easy!  Infact, I love them so much, I made another two from the Daisy Cottage fabric for our playroom...


I'd say they took around 30 - 45 minutes to make and I'd made three in just under an hour and a half.  The bit that takes the longest is pinning the ruffles!

So go give it a go!! Would love to see any ruffle cushions you make. 


Saturday, 23 June 2012

{Quick Tutorial} Funky Flower Button Brooch

Hello lovely followers!

Lots of new items have graced the shelves at TSB HQ over the last few weeks, including these super cute and funky flower buttons.

So thought a small tutorial was due!  Here's how to make this fab flower brooch....


You will need:


Small piece of felt 

1. Cut two small circles from your felt.  This will make the backing of your brooch.


2. Sew your brooch bar onto one of the circles.  Depending on how neat you've sewn it on or whether you are giving it as a gift, you may want to cover the stitches with another small circle of felt on the right side.


3.  Layer your flowers and the felt together ready to be sewn.


4. Then carefully sew together the two buttons and the felt.


5. Sew the two layers of felt together...


6. Then there you have it, one very cute and simple flower brooch!


All the products can be purchased in the shop, so why not give it a go!


p.s. new Design Team packs are going out tomorrow so some new makes from them using a new fabric will be coming soon!!


Tuesday, 17 January 2012

How to Fold a Fat Quarter

Fabric is being delivered thick and fast at the moment and Im busy putting together collections, photographing different items and generally getting ready for the launch on 1st March 2012.

I decided that, at the craft fairs and trade shows, rather than sell fabrics by the meter, which would involve lugging A LOT of stock around, I'll be selling pre cut Fat Quarters.  I love nothing more than seeing a folded stack of fat quarters (my local fabric shops rolls them up and it just doesnt look the same!).

I found a fab tutorial online about how to fold a fat quarter so its perfect.

Take a look at it here.

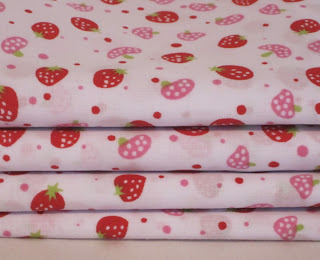
Here's my favourite fabric thats come in of late, all folded into perfect fat quarters...


Mmmmm...strawberries and shrooms
Would love to know what you think of this fabric?  It slightly reminds me of summer!